Fall Garden Care

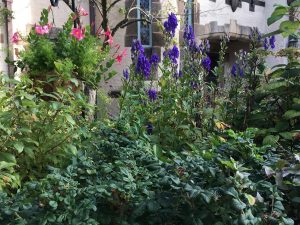
Aconitum ‘Spark’s Variety’ next to hanging basket of Mandevilla and in back of Rosa rugosa

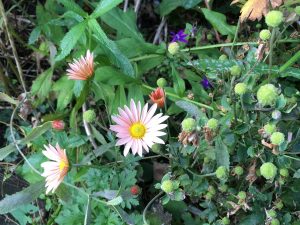
Chrysanthemum ‘Cottage Apricot’

Hydrangea macrophylla Let’s Dance Rhapsody Blue is a strong pink because I did not add aluminum sulfate to the soil. Shown here with “purple” zinneas, Rosa ‘Natascha’ and Clematis ‘Walenberg’
My favorite fall blooming perennials are finally starting to show their colors. I love the dark blue of Aconitum carmichaelii ‘Spark’s Variety’ and the apricot daisies of Chyrsanthemum ‘Cottage Apricot’. Several of my macrophylla hydrangeas are not only still in bloom, they have flower buds that will probably open within a few weeks.
On Wednesday, I received the email blog of Brent and Becky’s Bulbs about fall garden care and think you will find it quite valuable. I have copied it just below for you.
Brent’s Guide to Fall Garden Care
Right now, it’s winter prep time for us in the mid-Atlantic. As much as we don’t want to hear it, we’re fixing to get a frost soon. But, while it may mean we’ll want to be spending more time inside away from the cold, there’s still plenty that needs to be done in the garden before the snow falls. Here’s what you’ll need to do:
Feed Your Soil
Now is the ideal time to prep your beds, so let’s start by feeding your soil! Remember, though, it doesn’t want a “red bull” chemical fertilizer—it wants organic matter. Organic matter, like compost and humus, is filled with all the bacteria and fungi soil needs to turn it into black gold. They nourish the biome by making all the minerals and nutrients in the soil bioavailable to the plants.
Fungi do an amazing job of forming a symbiotic relationship with the plants’ roots. You see, fungi aren’t green, which means they don’t have chlorophyll, so they can’t get the starches and sugars they need. But, plants do, and they use the plants as a means to get it. In return, they bring minerals and moisture over to the plants’ roots that were far beyond their reach, forming a truly incredible partnership!
Of course, bacteria, when properly associated, takes in nitrogen from the air and brings it to the plants’ roots—another essential relationship that helps our soil and, by extension, our plants to stay healthy and strong. So, feed your soil compost. Between now and December, I try to put on at least a couple of inches, but most people don’t make nearly that much at home. But, luckily, compost is usually readily available from most municipalities’ public works departments. They use the bags of leaves they collect on the side of the road at this time of year to make their own!
Planting with Clay Soil
Putting bulbs in clay or heavy soil can often be problematic, depending on how well it drains, since most bulbs won’t appreciate laying in a pool of water for too long. Not to mention, it also blocks oxygen from getting to the roots. Becky often has this problem in her garden—which has grey, model clay that is very fine. But she has come up with a pretty clever solution!
Rather than excavating holes for the bulbs within the heavy clay—which would create an ideal bog situation—Becky starts by putting compost right on top of it. Then, she plants her bulbs right on top of the newly laid compost, layers the compost around the necks of the bulbs, and mulches on top! Now, the typical rule for planting bulbs is to plant 3x as deep as the height of the bulb. So, for this method, if you measure the bulb and it needs a 6-inch planting depth, if you cover up to the neck of the bulb, that will cover 2 inches, and the rest can just be mulch.
Plant After First Freeze in a Moist Bed
When the soil temperatures get down to 60 degrees with the upcoming frost, that will be ideal rooting time for spring-blooming bulbs. So, when the temperature gets low enough to freeze, that’s when you’ll want to be planting. (Bobbie caveat: I hate to freeze so don’t usually wait that long to plant.) But, if you’re like us here in the middle Atlantic, where it’s been dry for about 6 weeks, you’ll need to irrigate to ensure the soil has enough moisture. Without it, the bulbs won’t be able to make their roots, which they need to do to give them the cold hardiness they need to last through the winter. So if you don’t get any rain before the first freeze, be sure to give your soil a nice, long drink after planting.
Other Fall Garden Care Tips
Keep critters out. As we know, some bulbs are critter-proof, some are critter-resistant, and some bulbs are just like ice cream cones and lollipops to rodents and deer. So, to keep those pests away from the bulbs they do enjoy, plant plenty of critter-resistant bulbs that give off a strong smell, like alliums and fritillaria, to keep them at bay. Also, never plant with bone meal—the phosphorus and calcium smells just like bones and will draw them in just as much as the tasty bulbs themselves.
Fertilize after planting. Most bags of fertilizer will say to feed after blooming, but by that point, you will have missed the whole season’s growth! It takes time for nutrients to get to the root level of bulbs, so if you feed after blooming, even the foliage will be dead by the time it gets to bulb level! Do it in autumn after planting, that way it will be there when the plant needs it. If you can’t use compost and you want to use fertilizer, try an organic one like Espoma Bulb Tone, or a chemical fertilizer where the 2nd and 3rd numbers are higher than the 1st.
Mark your bulbs. If you want to remember where your clumps of bulbs are (though, I recommend doing the whole garden), you can take a few cheap golf tees—the brightly-colored ones—and stick them in, so you don’t accidentally dig up existing bulbs when it comes time to plant again. Or you can also mark the empty spots instead, which will show you exactly where to start digging!
If you don’t subscribe to their bulb catalog, I suggest you do so for breadth and depth of species and cultivars as well as high quality. Hope you found their blog helpful.


0 Comments